How to make hair look better? How can you come up with a beautiful editor? Don't say much. Hurry up and take a look at these simple and beautiful editor tutorials. Get started easily!
1. Simple editing
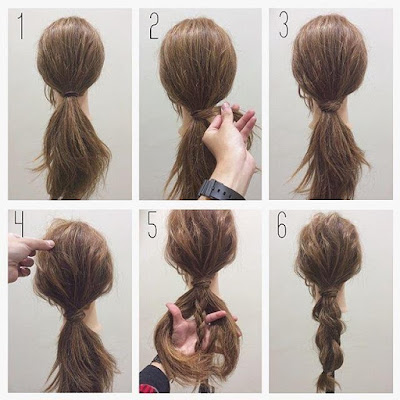
Step 1: First pierce a simple and loose pony tail. Be careful not to get the rubber band too close to the scalp.
Step two: Then pierce a hole in the middle of the hair and squeeze the ponytail from the outside to the inside.
Step 3: Then we tie a second ponytail at a distance.
Step 4: Repeat the method of Step 2 and pierce the hair out to the second hole, then create a fluffy feeling in circles.
Step 5: Repeat this technique to create a third circle.
Step 6: Next, we rolled the ponytail around the first rubber band tightly in a circular manner and fixed it with a rubber band.
Step 7: Finally, decorate with hairpins and you're done.
2. beautiful editing
Step one: First divide the hair into three unequal amounts of hair, and then insert it inside to get the picture one.
Step 2: Tie the hair on both sides together, and then tuck the hair from the outside in.
Step 3: first make the shape fluffy.
Step 4: Squeeze the horsetail from above into the hollow of the horsetail from below.
Step 5: Then we tighten the rubber band of the pony tail below, so that the two layers are closer together.
Step 6: Then we will use the hair extension tool to split the ponytail into two parts and insert it into the hair.
Step 7: The effect of stuffing the pony tail is shown in the figure.
Step 8: Put on the hairpin decoration, and the beautiful braiding is done.
3. Temperament
Step 1: Fix the upper half of the hair with rubber bands.
Step 2: Put the tied pony tail from top to bottom, and then tighten the rubber band, a shape similar to a twist braid will appear.
Step 3: Use the next layer of hair to make a twist braid in the same way.
Step 4: Create a fluffy feel.
Step 5: Mix the two ponytails together to make a large twist braid.
Step 6: Attach the bow and finish the braiding.
4.Bridal hair
Step 1: First divide the hair into three parts. The hair volume in the middle part is still too high.
Step 2: Make small hairs on both sides into cute little braids, and then fix them with rubber bands.
Step 3: Tie the hair in the middle, pay attention to the tightness of the rubber band and the details of its location.
Step 4: We rolled up the middle hair end like a circle and clamped it with a clip.
Step 5:then use the small braids on both sides to entangle along the middle gap, and finally bring the decorative jewelry, which is perfectly completed.
5. girl compilation
Step 1: Tie up all the hair at once and fix it at a certain height on the back of the head.
Step 2: Take a part of the pony tail and twist it repeatedly in the same direction as twisting clothes.
Step 3: Then wind it on the rubber band.
Step 4: Then take a part of the same operation to rotate.
Step 5: Fix it on the next layer so that they follow the figure in front.
Step 6: Then tie up the rest of the hair and repeat it again.
Step 7: Put on the little decorations and feel great.
6.centipede dish hair
Step one: tie up the hair of the previous half.
Step Two: Then, turn the hair inward like a flip.
Step three: Then pick up the hair on both sides and braid each other.
Step 4: Combine the small braids on both sides and fix them. Pay attention to the fluffiness of the hair.
Step 5: Then we deal with the lower half, which is still divided into three parts, and we turn them into small twist braids in order to create a sloppy style.
Step 6: First buckle the small braid in the middle and fix it.
Step 7: At last, fix the pigtails on both sides in a disorderly direction and wear hair clips to decorate them, which is super advanced.
7.Lady hair
Step 1: First, take a small amount of hair from one side, divide it into two parts and mess it together with a cross method.
Step 2: The same operation is performed on the right side, and then they are fixed together.
Step 3: We use a hair band to fix all the pony tails so that the pony tail overlaps the rubber band above.
Step 4: Wrap the remaining headband around the top of the head and tie it. Will it look good?
8.sweet compilation
Step 1: First divide the two sides into two equal parts and distinguish them with clips.
Step 2: Tie one side of the hair with a rubber band, and insert it inside.
Step 3: Then process the hair on the right side, just the same way.
Step 4: Weave a ponytail on one side into a cute little pigtail.
Step 5: On the other side, weave the ponytail into small braids.
Step 6: This effect will be seen from the side.
Step 7: Wrap the two small braids on both sides in a disorderly way, and decorate them with a bow.
9. Atmospheric editing
Step 1: Hair with a certain degree of curvature is the best.
Step 2: Tie up one half of the hair in the upper half.
Step 3: Insert it inward and hold the next layer of hair to create the same shape.
Step 4: Create a fluffy effect that makes the entire shape appear to double the volume.
Step 5: Tie the ends of the broken hair back together and push it into the hair.
10.Cute braided hair
Step 1: Let's take the ear as the border and take out the hair on both sides.
Step 2: Rotate the hair on both sides and tie them together.
Step 3: Make one more layer of shape by the same operation steps.
Step 4: Create a fluffy look.
Step 5: Use a small hair band to tie the pony tail, so that the effect is more lovely and more temperamental.


Comments
Post a Comment